There are many times when we need to get large amounts of data into a system, but the front end of the application doesn’t provide a way to do it quickly. This creates a dilemma of how to get hundreds or thousands of items loaded, without doing it by hand, which could take days. Alteryx is a solution that makes data movement, blending, and loading quick and easy. It is also a solution that requires ZERO SQL, or other coding skills so more users can be part of the process.
During a new implementation of PowerSchool’s eFinancePLUS, a district wanted to use the system’s ability to calculate the workers’ compensation premiums during the pay run processing. They created the appropriate codes and assigned them to the right job classes for the processing to occur. However, the codes were not able to be added en masse to individual employee records for later use in running informational reports.
Because the district had added the codes to employee records in a spreadsheet, an Alteryx workflow was created to update the appropriate table in the database with the assigned codes. An explanation of the workflow process follows.
The actual SQL server/database connection information is hard-coded in the workflow.
The demographic conversion spreadsheet with employee information has many columns, but it must have the [EMPLOYEE NUMBER] and [WORKCOMP] columns. It can only contain one sheet.
 Since the directory path and name of the spreadsheet could vary, a ‘File Browse’ Interface Tool is used to ask the user to locate the desired file. Text is displayed that instructs the user on what to do.
 An ‘Action’ Interface Tool is used to tell Alteryx what to do with the information. In this case, the action type is ‘Update Input Data Tool (Default)’ and it is required.
 An ‘Input Data’ tool is used to define information about the spreadsheet data. The default name assigned in the configuration will be replaced with the file name selected by the user in the previous step.
 A ‘Select’ tool is used to keep only the employee number and workers comp code from all the columns in the spreadsheet. The Size field of the workers comp code was changed from the default setting of 255 to 4, as that’s how it’s defined in the database table.
 A ‘Filter’ tool is used with a Custom Filter to keep only the rows where both the employee number and the workers comp code are not Null. The expression used is:
!IsNull([EMPLOYEE NUMBER]) and !IsNull([WORKCOMP])
This tool has two outputs – T(rue) and F(alse). Nothing is done with the records that don’t meet the criteria and that portion of the workflow ends. The rows that meet the condition are passed to the ‘Join’ Tool.
 An ‘Input Data’ tool is used to connect to the server and access the reference table where the valid workers’ comp codes are assigned to job classes. A SQL statement is used to accomplish this and is entered in the ‘Table or Query’ configuration option:
Select distinct wkr_comp From clstable
A list of distinct values is returned as the same code could be assigned to more than one job class. The resulting rows are passed to the ‘Join’ Tool.
 A ‘Join’ tool combines the output from the previous steps and has three possible outputs. ‘Join by Specific Fields’ is selected in the configuration and the common field from the database table is associated to the common field from the employee information (workers’ comp code).
The ‘Left’ output contains the database reference table values that don’t match any of the employee records. Nothing is done with these records and this portion of the workflow ends.
The ‘Right’ output contains the employee records with a workers’ comp code that has not been assigned to any job class records. Since pay run processing is based on values in the job class table, if codes assigned to employees are NOT assigned to any job class records, no processing occurs, and having employees assigned to these codes is irrelevant. These records will be displayed for the user to review.
The ‘Join’ output contains the employee records with a workers’ comp code that has been assigned to at least one job class. These records can be used to update the database table.
 An ‘Output Data’ tool is used to update the database table. The server information and destination table are hard-coded in the configuration. The ‘Output Options’ value is set to ‘Update: Warn on Update Failure’ and the ‘Append Field Map’ uses a ‘Custom Mapping’ to assign the workflow fields to the corresponding table fields, as shown:
![]()
 A ‘Sort’ tool is used to sort the records needing review by the user since their workers’ comp codes didn’t exist in the job class table. They are sorted by workers’ comp code then employee number.
 A ‘Table’ tool is used to set up the layout of the records for use in a report. ‘Table Mode’ is set to Basic in the configuration and ‘Show Column Headings’ is selected. The workers’ comp code is displayed first, then the employee number.
 A ‘Report Header’ tool is used to create a title for the report. The date and time is included in the header for this report, but no logo is added.
 A ‘Layout’ tool is used to order the output on the report. The ‘Layout Mode’ is set to ‘Each Individual Record’ in the configuration and the ‘Per Row Configuration’ specifies the ‘Header’ tool is displayed before the ‘Table’ tool.
 A ‘Folder Browse’ tool asks the user where the report should be saved. Text is displayed that instructs the user on what to do.
An ‘Action’ Interface Tool is used to tell Alteryx what to do with the information. In this case, the action type is ‘Update Value (Default)’. The ‘Replace a specific string’ option on the configuration is checked and the file path of the default file name for the report is entered in the text box. This information will be replaced by what the user has selected.
 A ‘Render’ tool is used to create the PDF report of the records the user needs to review. The ‘Output Mode’ in the configuration is set to ‘Choose a Specific Output File’ and a default file name including a directory path is entered. The directory path will be replaced by what the user selected in the previous step, but the file name entered will be used as-is.
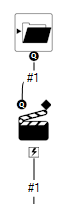
Because Interface Tools are used, Alteryx automatically sets the workflow configuration to ‘Analytic App’. (Clicking anywhere on the canvas – not a tool – displays the workflow configuration on the left.)
When the app is run by the user, a dialog box displays:
The user selects both the spreadsheet of employee information to import as well as the directory to save the PDF report in.
Clicking the ‘Finish’ button runs the workflow. If there are records needing review by the user, this displays when the workflow ends:
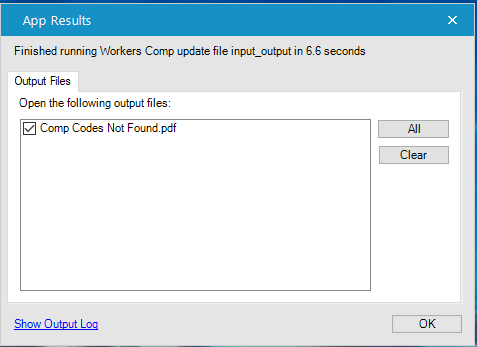
Clicking ‘OK’ opens the report. The user can also click the ‘Show Output Log’ link to see the number of records processed at each step.
If there are no records needing review by the user, this displays when the workflow ends:
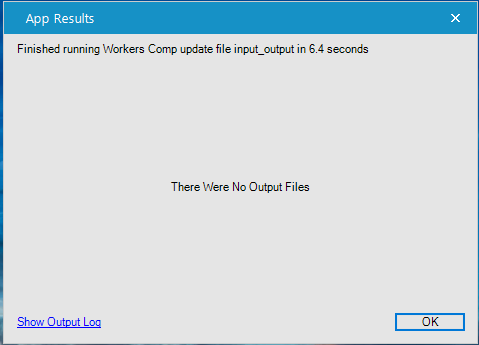
The user is returned to the main dialog screen where they can run the workflow again with a different input file if desired, or click the ‘Exit’ button to close the app.
Using Alteryx to create a workflow allows the user to update data in a table without knowing any SQL. They can run the process multiple times if they decide to change or add codes after the initial run. Built-in data checking can also prevent errors in data later.
For additional information, please contact us at info@capitalizeconsulting.com!