Get the Starter Kit
First, be sure that you have the Alteryx Predictive Tools installed; instructions on how to install them can be found here. Then click here to download the Snowflake Starter Kit and fill out the requested information; an executable file will download. (Before running the executable file, you must have the Alteryx Predictive tools installed.) With the previous two requirements in place, you can run the starter kit executable, which will go through a wizard to finish the install.
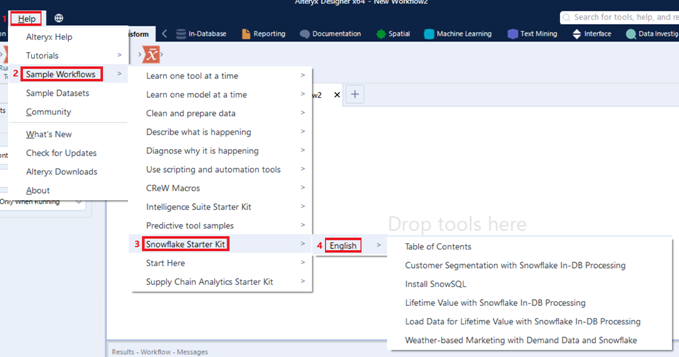
Once the installation is complete, you can open Designer to find the starter kit resources. In Designer, you go to Help > Sample Workflows > Snowflake Starter Kit > English (see below). From here, you can open any of the six workflow files to run and edit. Note that before you run any of the workflows, you need access to a Snowflake account. That account can be an existing one, or you can set up a free trial here.
Starter Kit Components
The Snowflake starter kit includes six workflows. The ‘Table of Contents’ file provides general background and instructions on how to use the kit. This file also contains embedded videos that walk through multiple ways of setting up a Snowflake data connection. The data connections rely on the ODBC driver for Snowflake; for instructions on how to set up the driver, please see the blog Using Alteryx to Push and Pull Data with Snowflake.
The other five workflows are prebuilt processes that push and pull data between Alteryx and Snowflake. Each workflow has instructions on how to update the input and output data connections to Snowflake.
- ‘Load Data for Lifetime Value with Snowflake In-DB Processing’ – This workflow must be run first; it takes files included in the starter kit and uploads the data into a Snowflake data table. It is an analytic app that prompts for Snowflake account information and then runs a Python script to run SQL that creates the table and loads the file.
- ‘Lifetime Value with Snowflake In-DB Processing’ – Using the data loaded from the previous file, this workflow demonstrates how to use the In-DB tools to execute certain data preparation steps using Snowflake’s query optimization performance. The process also illustrates how Alteryx can complete more complex modeling and forecasting that is impossible within the database.
- ‘Customer Segmentation with Snowflake In-DB Processing’ – This workflow uses demo data that already exists in your Snowflake database when you set up a trail. Again, this workflow uses a mix of In-DB processing and Alteryx processing for more advanced functionality.
- ‘Weather-based Marketing with Demand Data and Snowflake’ – The intent of this workflow is to introduce the Snowflake Data Marketplace; the source data is pulled from a database on the marketplace. There are step-by-step instructions for how to request access from the data provider for the use case.
- ‘Install SnowSQL’ – This workflow is not centered around data access and analysis but rather means for installing a Snowflake solution for executing queries. The SnowSQL client will help you run more complex SQL, DDL, and DML queries for database management.