How to Use
The Alteryx XML Tool has the capability to create reports based on Alteryx Workflow (.yxmd) files, update connections and fields within the workflows, and track workflow changes over time. Most functions can be performed on multiple workflows at once. Before using the tool, you should identify or create a directory for the workflows you wish to document or update and a directory to store the parsed outputs.
Settings
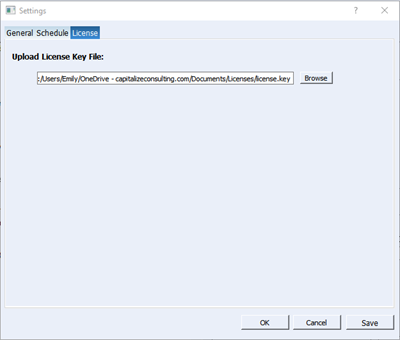
Upon opening the tool, most of the features will be locked until a license is provided. Navigate to File > Settings and you should see the License tab. Click browse and select the save location of your provided WAM License file. Click Save and the application should unlock if your license file was valid.
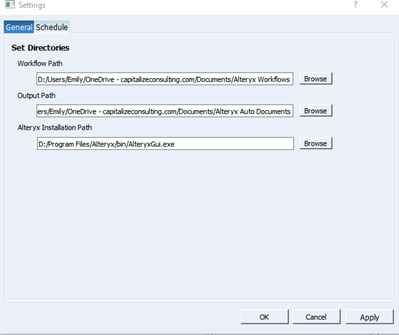
Before parsing or updating workflows, navigate to General tab in Settings and set the main Workflow Directory, the Output Directory (new folders will be created for each type of report) and your installation path for Alteryx (only needed to open Workflows in Alteryx from the tool). Once you select your workflow directory, the Select Workflows lists will populate with all .yxmd files within that directory and all sub-directories. Note that upon parsing, .xml version of the parsed workflows will be saved in the same folders.
Auto-Document
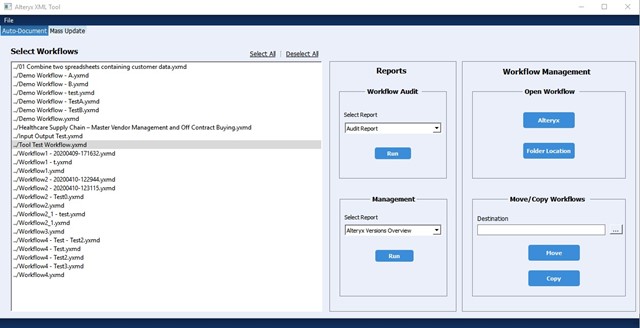
Navigate to the Auto-Document tab to create workflow reports. The Select Workflows list should be populated with your workflows.
Reports
Workflow Audit
Select the workflow(s) from the ‘Select Workflows’ list and the report you wish to run from the Workflow Audit dropdown. Once both are selected, click Run within the Workflow Audit section. The report output will be saved within your selected Output Path directory under a named folder. Note all outputs include the date and time of the report run.
Note that the detail parsing logic for all Alteryx tools is still in development, so only certain Alteryx tools will have details within the text file. Any errors that occur will show within the Console.
Report Options
Audit Report – Primary report. Word doc that includes summaries and details of the Workflow configuration. Information from the other reports is consolidated within this one.
Steps List – CSV export of ordered tool list.
Flow Graph – PDF flow chart of tool connections.
Detail Log – Text file that shows basic parsing output.

Management
The management reports encompass all workflows, so workflows do not need to be selected. To run management/admin reports, select the report from the Management report dropdown and click Run. The report output will be saved to the Management Reports folder in your set Output directory.
Workflow Management
Open Workflows
Open workflows directly in Alteryx by selecting workflow(s) and clicking the Alteryx button under the Open Workflow section. You can also open the save location of the selected workflow(s) by clicking Folder Location.
Move/Copy Workflows
Select workflow(s) and either move or copy them to the location set in the Destination field.
Mass Update
Navigate to the Mass Update tab to find and update fields within Alteryx workflows.
Connections
Click the Connections button to open the page to update workflow input and output connections.
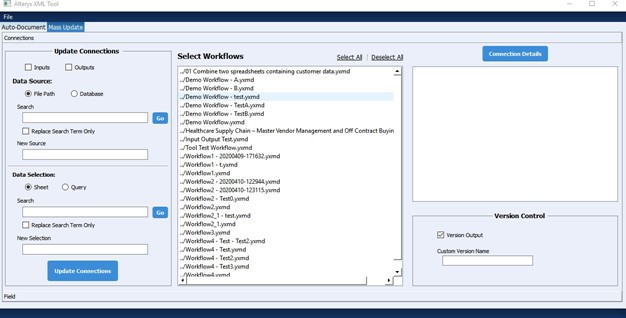
The Select Workflows list will already be populated based on the set Workflow Path. To view the existing connections within a workflow, select one or more workflows and click the Connection Details button. This will display all input and output connections that currently exist in the workflow. Once a workflow is selected, you can configure the updates you wish you make.
Select to update the Input or Output connection or select both. Note choosing neither option will update all connections.
Data Source
Choose to update either database or file-based data sources. You may search for your desired data source before making any changes. Entering a search term and clicking Go will repopulate your Select Workflows list with only workflows that contain the search term as a connection. Note the searches are case-sensitive.
Once you have determined the update that needs to be made, select the workflow(s) to be updated and set the new Data Source in the New Source field. Check the Replace Search Term Only option to replace the exact string in the search bar. If this option is not chosen then the entire Data Source will be replaced with the New Source. Note any replacement database connections must already be saved connections within Alteryx. Once the update fields are set, click Update Connection. The new workflow will appear at the end of the Select Workflows list.
Data Selection
The data selection update is made in the same manner as the Data Source. Within the Data Selection section, you may update either the database query or sheet within an Excel based file. You can update the Data Source and Data Selection at the same time if desired.
Version Control
When creating an updated workflow, the default behavior is to create a new workflow with the datetime appended. You may customize the file append string by setting a Custom Version Name.
Fields
Click the Field button to update a field across tools and workflows.
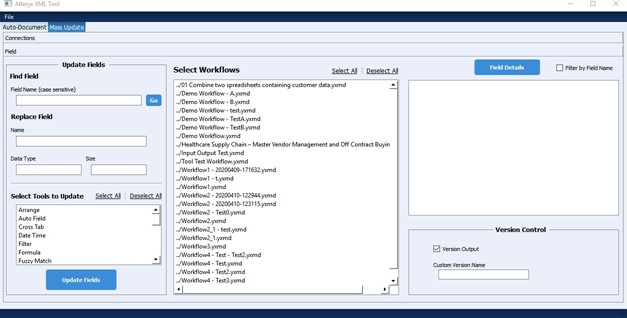
The Select Workflows list here will also be populated based on Settings. To view the fields that currently exist within workflow(s), choose one or more workflows from the select list and click Field Details.
To find workflows with a specific field, use the search bar under Find Field. The select workflows list will be updated to show only workflows that contain the field. Additionally, you may filter the field details to show only the field you are searching for by checking the Filter by Field Name option and re-clicking Field Details.
To Replace fields, set the new field Name (required) and data type and size (optional). These fields will be updated wherever applicable. You’ll also need to select which tools should be updated within the Select Tools to Update section. Once the update parameters have been set, click Update Fields and the new workflow will appear at the bottom of the Select Workflows list.
Track Changes
With the Track Changes feature you can automatically document changes made to your workflows over time.
In the Tracked Workflows section, click Add and choose a workflow to track. Currently you may only add one workflow at a time. Once you select the workflow, you should receive a message that the workflow is loading. Once the workflow has finished processing, the workflow file name will appear in the Tracked workflow list. Click on the workflow to see the available versions.
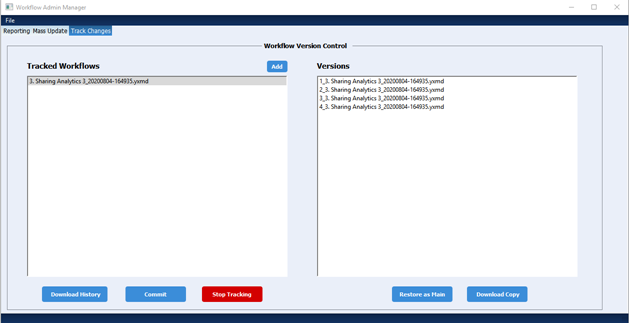
Download History
With the Tracked Workflow selected, click the Download History button to generate a Change History report. The Change History report contains a Summary and Detail of the tools and fields that were altered.
Commit
With the Tracked Workflow selected, click the Commit button to manually process the workflow and check for any updates. Once the process is complete, click the Tracked Workflow again and you will see a new version saved with the latest updates.
Stop Tracking
Use the Stop Tracking button to remove a workflow from the Tracked Workflows list and delete any saved change history and versions. Only use this option if you are sure you want to delete all tracking data.